" height="9.18705px" id="AiyYyR90G" transform="translate(3.406 3.406)" width="9.18685px"/></svg>)
" height="1.90314px" id="wtDTm6bEW" transform="translate(26.225 0)" width="2.4723000000000006px"/><path d="M 0.557 0 L 1.438 0 C 1.746 0 1.995 0.25 1.995 0.559 L 1.995 1.344 C 1.995 1.653 1.746 1.903 1.438 1.903 L 0.557 1.903 C 0.25 1.903 0 1.653 0 1.344 L 0 0.559 C 0 0.25 0.25 0 0.557 0 Z" fill="rgb(29, 28, 27)" height="1.9031500000000001px" id="GnmDnNra_" transform="translate(36.408 2.728)" width="1.9953000000000003px"/><path d="M 6.224 0 L 0.558 0 C 0.25 0 0 0.25 0 0.559 L 0 1.344 C 0 1.653 0.25 1.903 0.558 1.903 L 6.224 1.903 C 6.531 1.903 6.781 1.653 6.781 1.344 L 6.781 0.559 C 6.781 0.25 6.531 0 6.224 0 Z" fill="rgb(29, 28, 27)" height="1.9031500000000001px" id="hKTQ3dbw4" transform="translate(34.261 5.456)" width="6.781100000000002px"/><path d="M 6.955 0 L 0.558 0 C 0.25 0 0 0.25 0 0.559 L 0 1.344 C 0 1.653 0.25 1.903 0.558 1.903 L 6.955 1.903 C 7.263 1.903 7.513 1.653 7.513 1.344 L 7.513 0.559 C 7.513 0.25 7.263 0 6.955 0 Z" fill="rgb(29, 28, 27)" height="1.9031500000000001px" id="G1Zzk9CUU" transform="translate(28.298 8.243)" width="7.513100000000001px"/><path d="M 7.123 0 L 0.558 0 C 0.25 0 0 0.25 0 0.559 L 0 1.344 C 0 1.653 0.25 1.903 0.558 1.903 L 7.123 1.903 C 7.431 1.903 7.681 1.653 7.681 1.344 L 7.681 0.559 C 7.681 0.25 7.431 0 7.123 0 Z" fill="rgb(29, 28, 27)" height="1.9030999999999985px" id="fm7cHxIfJ" transform="translate(0 10.972)" width="7.68067px"/><path d="M 13.447 0 L 0.558 0 C 0.25 0 0 0.25 0 0.559 L 0 1.344 C 0 1.653 0.25 1.903 0.558 1.903 L 13.447 1.903 C 13.755 1.903 14.004 1.653 14.004 1.344 L 14.004 0.559 C 14.004 0.25 13.755 0 13.447 0 Z" fill="rgb(29, 28, 27)" height="1.9030999999999985px" id="LowSwDrtg" transform="translate(9.552 10.972)" width="14.0044px"/><path d="M 0.558 0 L 8.212 0 C 8.52 0 8.77 0.25 8.77 0.559 L 8.77 1.344 C 8.77 1.653 8.52 1.903 8.212 1.903 L 0.558 1.903 C 0.25 1.903 0 1.653 0 1.344 L 0 0.559 C 0 0.25 0.25 0 0.558 0 Z" fill="rgb(29, 28, 27)" height="1.9030999999999985px" id="xRiKc2od7" transform="translate(27.041 10.972)" width="8.769900000000003px"/><path d="M 0.557 0 L 5.4 0 C 5.708 0 5.958 0.25 5.958 0.559 L 5.958 1.344 C 5.958 1.653 5.708 1.903 5.4 1.903 L 0.557 1.903 C 0.25 1.903 0 1.653 0 1.344 L 0 0.559 C 0 0.25 0.25 0 0.557 0 Z" fill="rgb(29, 28, 27)" height="1.9031500000000001px" id="JWdNVicde" transform="translate(36.796 8.243)" width="5.957599999999999px"/><path d="M 1.438 0 L 0.558 0 C 0.25 0 0 0.25 0 0.559 L 0 1.344 C 0 1.653 0.25 1.903 0.558 1.903 L 1.438 1.903 C 1.746 1.903 1.995 1.653 1.995 1.344 L 1.995 0.559 C 1.995 0.25 1.746 0 1.438 0 Z" fill="rgb(29, 28, 27)" height="1.9031500000000001px" id="RfFYVCT_T" transform="translate(28.717 5.456)" width="1.9953000000000003px"/><path d="M 0.558 0 L 2.895 0 C 3.203 0 3.453 0.25 3.453 0.559 L 3.453 1.406 C 3.453 1.714 3.203 1.964 2.895 1.964 L 0.558 1.964 C 0.25 1.964 0 1.714 0 1.406 L 0 0.559 C 0 0.25 0.25 0 0.558 0 Z" fill="rgb(29, 28, 27)" height="1.964299999999998px" id="dngJ6MU2p" transform="translate(16.183 24.582)" width="3.4525000000000006px"/><path d="M 1.706 0 L 0.558 0 C 0.25 0 0 0.25 0 0.559 L 0 1.406 C 0 1.714 0.25 1.964 0.558 1.964 L 1.706 1.964 C 2.014 1.964 2.263 1.714 2.263 1.406 L 2.263 0.559 C 2.263 0.25 2.014 0 1.706 0 Z" fill="rgb(29, 28, 27)" height="1.964299999999998px" id="N_fstvKmR" transform="translate(22.18 24.582)" width="2.2631999999999977px"/><path d="M 0.558 0 L 5.544 0 C 5.852 0 6.101 0.25 6.101 0.559 L 6.101 1.406 C 6.101 1.714 5.852 1.964 5.544 1.964 L 0.558 1.964 C 0.25 1.964 0 1.714 0 1.406 L 0 0.559 C 0 0.25 0.25 0 0.558 0 Z" fill="rgb(29, 28, 27)" height="1.964299999999998px" id="t55XLYcgb" transform="translate(25.486 24.582)" width="6.101399999999998px"/><path d="M 1.976 0 L 0.558 0 C 0.25 0 0 0.25 0 0.559 L 0 1.406 C 0 1.714 0.25 1.964 0.558 1.964 L 1.976 1.964 C 2.284 1.964 2.533 1.714 2.533 1.406 L 2.533 0.559 C 2.533 0.25 2.284 0 1.976 0 Z" fill="rgb(29, 28, 27)" height="1.964299999999998px" id="ZrEKTVTAe" transform="translate(28.542 21.854)" width="2.5334000000000003px"/><path d="M 0.557 0 L 1.438 0 C 1.746 0 1.995 0.25 1.995 0.559 L 1.995 1.406 C 1.995 1.714 1.746 1.964 1.438 1.964 L 0.557 1.964 C 0.25 1.964 0 1.714 0 1.406 L 0 0.559 C 0 0.25 0.25 0 0.557 0 Z" fill="rgb(29, 28, 27)" height="1.964299999999998px" id="Z0fPTp9aR" transform="translate(11.425 24.582)" width="1.9953000000000003px"/><path d="M 0 0.559 C 0 0.251 0.251 0 0.558 0 L 1.438 0 C 1.745 0 1.995 0.251 1.995 0.559 L 1.995 1.405 C 1.995 1.713 1.745 1.964 1.438 1.964 L 0.558 1.964 C 0.251 1.964 0 1.713 0 1.405 Z" fill="rgb(29, 28, 27)" height="1.964299999999998px" id="Tj_PDHFDh" transform="translate(20.635 27.308)" width="1.9954px"/><path d="M 0.557 0 L 1.342 0 C 1.65 0 1.899 0.25 1.899 0.559 L 1.899 1.406 C 1.899 1.714 1.65 1.964 1.342 1.964 L 0.557 1.964 C 0.25 1.964 0 1.714 0 1.406 L 0 0.559 C 0 0.25 0.25 0 0.557 0 Z" fill="rgb(29, 28, 27)" height="1.9643000000000015px" id="AYq9dXkKz" transform="translate(18.686 30.036)" width="1.8994px"/><path d="M 0.558 0 L 5.768 0 C 6.076 0 6.326 0.25 6.326 0.559 L 6.326 1.344 C 6.326 1.653 6.076 1.903 5.768 1.903 L 0.558 1.903 C 0.25 1.903 0 1.653 0 1.344 L 0 0.559 C 0 0.25 0.25 0 0.558 0 Z" fill="rgb(29, 28, 27)" height="1.9031500000000001px" id="rspevfJcx" transform="translate(12.157 8.243)" width="6.325900000000001px"/><path d="M 3.285 0 L 0.558 0 C 0.25 0 0 0.25 0 0.559 L 0 1.344 C 0 1.653 0.25 1.903 0.558 1.903 L 3.285 1.903 C 3.593 1.903 3.842 1.653 3.842 1.344 L 3.842 0.559 C 3.842 0.25 3.593 0 3.285 0 Z" fill="rgb(29, 28, 27)" height="1.9031500000000001px" id="XRUAhGnph" transform="translate(23.887 2.728)" width="3.8424000000000014px"/><path d="M 0.558 0 L 5.644 0 C 5.952 0 6.202 0.25 6.202 0.559 L 6.202 1.344 C 6.202 1.653 5.952 1.903 5.644 1.903 L 0.558 1.903 C 0.25 1.903 0 1.653 0 1.344 L 0 0.559 C 0 0.25 0.25 0 0.558 0 Z" fill="rgb(29, 28, 27)" height="1.9031500000000001px" id="VsaVVIfke" transform="translate(21.528 5.456)" width="6.201600000000003px"/><path d="M 3.06 0 L 0.558 0 C 0.25 0 0 0.25 0 0.559 L 0 1.344 C 0 1.653 0.25 1.903 0.558 1.903 L 3.06 1.903 C 3.369 1.903 3.618 1.653 3.618 1.344 L 3.618 0.559 C 3.618 0.25 3.369 0 3.06 0 Z" fill="rgb(29, 28, 27)" height="1.9030999999999985px" id="wiAKEgyId" transform="translate(40.819 10.972)" width="3.6182000000000016px"/><path d="M 0.558 0 L 17.318 0 C 17.626 0 17.875 0.25 17.875 0.559 L 17.875 1.345 C 17.875 1.653 17.626 1.903 17.318 1.903 L 0.558 1.903 C 0.25 1.903 0 1.653 0 1.345 L 0 0.559 C 0 0.25 0.25 0 0.558 0 Z" fill="rgb(29, 28, 27)" height="1.9032px" id="FIE0ufK9m" transform="translate(6.666 13.7)" width="17.87506px"/><path d="M 6.426 0 L 0.558 0 C 0.25 0 0 0.25 0 0.559 L 0 1.345 C 0 1.653 0.25 1.903 0.558 1.903 L 6.426 1.903 C 6.734 1.903 6.984 1.653 6.984 1.345 L 6.984 0.559 C 6.984 0.25 6.734 0 6.426 0 Z" fill="rgb(29, 28, 27)" height="1.9032000000000018px" id="ut9UWny3L" transform="translate(22.892 19.156)" width="6.983599999999999px"/><path d="M 0.558 0 L 22.151 0 C 22.459 0 22.709 0.25 22.709 0.559 L 22.709 1.344 C 22.709 1.653 22.459 1.903 22.151 1.903 L 0.558 1.903 C 0.25 1.903 0 1.653 0 1.344 L 0 0.559 C 0 0.25 0.25 0 0.558 0 Z" fill="rgb(29, 28, 27)" height="1.9030999999999985px" id="VULnffgbk" transform="translate(9.552 16.428)" width="22.7089px"/><path d="M 7.886 0 L 0.558 0 C 0.25 0 0 0.25 0 0.559 L 0 1.345 C 0 1.653 0.25 1.903 0.558 1.903 L 7.886 1.903 C 8.194 1.903 8.443 1.653 8.443 1.345 L 8.443 0.559 C 8.443 0.25 8.194 0 7.886 0 Z" fill="rgb(29, 28, 27)" height="1.9032000000000018px" id="adZTYr4MR" transform="translate(6.078 19.156)" width="8.44303px"/><path d="M 0.558 0 L 2.211 0 C 2.519 0 2.769 0.25 2.769 0.559 L 2.769 1.406 C 2.769 1.714 2.519 1.964 2.211 1.964 L 0.558 1.964 C 0.25 1.964 0 1.714 0 1.406 L 0 0.559 C 0 0.25 0.25 0 0.558 0 Z" fill="rgb(29, 28, 27)" height="1.964299999999998px" id="bwdUdEmCH" transform="translate(13.784 21.854)" width="2.768600000000001px"/><path d="M 2.424 0 L 0.558 0 C 0.25 0 0 0.25 0 0.559 L 0 1.406 C 0 1.714 0.25 1.964 0.558 1.964 L 2.424 1.964 C 2.732 1.964 2.982 1.714 2.982 1.406 L 2.982 0.559 C 2.982 0.25 2.732 0 2.424 0 Z" fill="rgb(29, 28, 27)" height="1.964299999999998px" id="PUvesMJEj" transform="translate(23.556 21.854)" width="2.982199999999999px"/><path d="M 0.558 0 L 2.241 0 C 2.55 0 2.799 0.25 2.799 0.559 L 2.799 1.406 C 2.799 1.714 2.55 1.964 2.241 1.964 L 0.558 1.964 C 0.25 1.964 0 1.714 0 1.406 L 0 0.559 C 0 0.25 0.25 0 0.558 0 Z" fill="rgb(29, 28, 27)" height="1.964299999999998px" id="Wo2W7J3Zj" transform="translate(8.672 21.854)" width="2.799050000000001px"/><path d="M 6.661 0 L 0.558 0 C 0.25 0 0 0.25 0 0.559 L 0 1.345 C 0 1.653 0.25 1.903 0.558 1.903 L 6.661 1.903 C 6.969 1.903 7.219 1.653 7.219 1.345 L 7.219 0.559 C 7.219 0.25 6.969 0 6.661 0 Z" fill="rgb(29, 28, 27)" height="1.9032px" id="PpPVZXp9j" transform="translate(27.041 13.7)" width="7.218900000000001px"/><path d="M 0.621 1.905 C 0.218 1.905 0 1.687 0 1.283 L 0 0.622 C 0 0.218 0.218 0 0.621 0 L 11.225 0 C 11.628 0 11.846 0.218 11.846 0.622 L 11.846 1.283 C 11.846 1.687 11.628 1.905 11.225 1.905 L 6.934 1.905 L 6.934 14.926 C 6.934 15.33 6.716 15.548 6.313 15.548 L 5.537 15.548 C 5.134 15.548 4.916 15.33 4.916 14.926 L 4.916 1.905 Z" fill="rgb(29, 28, 27)" height="15.54825px" id="xr32fxeO6" transform="translate(52.177 8.243)" width="11.845599999999997px"/><path d="M 0.621 0 C 0.218 0 0 0.218 0 0.622 L 0 14.924 C 0 15.328 0.218 15.546 0.621 15.546 L 1.357 15.546 C 1.76 15.546 1.978 15.328 1.978 14.924 L 1.978 0.622 C 1.978 0.218 1.76 0 1.357 0 Z" fill="rgb(29, 28, 27)" height="15.546050000000001px" id="oSsO_UPVN" transform="translate(90.476 8.243)" width="1.9779000000000053px"/><path d="M 0.62 15.546 C 0.217 15.546 0 15.328 0 14.924 L 0 0.622 C 0 0.218 0.217 0 0.62 0 L 1.396 0 C 1.799 0 2.017 0.218 2.017 0.622 L 2.017 13.632 L 8.981 13.632 C 9.384 13.632 9.602 13.85 9.602 14.254 L 9.602 14.924 C 9.602 15.328 9.384 15.546 8.981 15.546 Z" fill="rgb(29, 28, 27)" height="15.546050000000001px" id="Sgj4z5osO" transform="translate(116.749 8.243)" width="9.602000000000004px"/><path d="M 1.974 14.924 C 1.974 15.328 1.756 15.546 1.353 15.546 L 0.621 15.546 C 0.218 15.546 0 15.328 0 14.924 L 0 0.622 C 0 0.218 0.218 0 0.621 0 L 1.357 0 C 1.76 0 1.978 0.218 1.978 0.622 L 1.978 5.747 C 2.634 4.721 3.806 4.079 5.309 4.079 C 8.18 4.079 10.356 6.358 10.356 9.948 C 10.356 13.538 8.18 15.817 5.309 15.817 C 3.801 15.817 2.627 15.175 1.971 14.145 L 1.971 14.922 Z M 8.36 9.95 C 8.36 7.362 6.881 5.928 5.121 5.928 C 3.361 5.928 1.863 7.362 1.863 9.95 C 1.863 12.539 3.361 13.972 5.121 13.972 C 6.881 13.972 8.36 12.539 8.36 9.95 Z" fill="rgb(29, 28, 27)" height="15.81665px" id="q13jjj7xd" transform="translate(138.401 8.243)" width="10.355999999999995px"/><path d="M 4.457 11.738 C 0.961 11.738 -0.019 9.872 0 8.318 C 0.005 7.929 0.253 7.735 0.645 7.735 L 1.344 7.735 C 1.748 7.735 1.922 7.949 1.961 8.352 C 2.063 9.315 2.693 9.907 4.433 9.907 C 6.174 9.907 7.012 9.269 7.012 8.289 C 7.012 7.425 6.522 7.108 5.305 6.899 L 3.209 6.539 C 1.453 6.238 0.29 5.247 0.29 3.468 C 0.29 1.467 1.774 0 4.518 0 C 7.263 0 8.838 1.491 8.814 3.23 C 8.81 3.614 8.553 3.808 8.165 3.808 L 7.457 3.808 C 7.054 3.808 6.908 3.595 6.851 3.202 C 6.749 2.477 6.159 1.818 4.518 1.818 C 2.878 1.818 2.249 2.508 2.249 3.403 C 2.249 4.175 2.695 4.516 3.81 4.714 L 5.906 5.083 C 7.72 5.404 8.98 6.292 8.98 8.198 C 8.98 9.976 7.908 11.74 4.455 11.74 Z" fill="rgb(29, 28, 27)" height="11.739799999999999px" id="tJ8syeWTW" transform="translate(150.024 12.325)" width="8.980269730401375px"/><path d="M 9.146 7.997 C 9.146 8.813 9.175 9.983 9.282 10.799 C 9.334 11.223 9.155 11.465 8.728 11.465 L 8.068 11.465 C 7.685 11.465 7.467 11.319 7.428 11.022 L 7.317 10.181 C 6.724 11.157 5.565 11.659 4.145 11.659 C 1.579 11.659 0 10.142 0 8.078 C 0 6.27 1.27 5.157 3.433 5.002 L 6.589 4.78 C 7.162 4.741 7.186 4.688 7.186 4.153 L 7.186 3.682 C 7.186 2.438 6.434 1.807 4.79 1.807 C 3.145 1.807 2.472 2.425 2.405 3.289 C 2.376 3.697 2.235 3.916 1.823 3.916 L 1.067 3.916 C 0.675 3.916 0.427 3.717 0.422 3.328 C 0.407 1.51 1.74 0 4.792 0 C 7.798 0 9.162 1.427 9.155 3.736 Z M 7.188 7.298 L 7.188 6.244 C 6.955 6.327 6.678 6.386 6.363 6.415 L 3.598 6.676 C 2.59 6.775 1.997 7.163 1.997 8.099 L 1.999 8.099 C 1.999 9.188 2.886 9.97 4.4 9.97 C 6.169 9.97 7.188 8.9 7.188 7.298 Z" fill="rgb(29, 28, 27)" height="11.658999999999999px" id="QPESIZvku" transform="translate(126.854 12.325)" width="9.290755130109668px"/><path d="M 5.224 0 C 8.313 0 10.295 2.255 10.295 5.456 L 10.295 5.694 C 10.295 6.098 10.077 6.316 9.674 6.316 L 1.998 6.316 C 2.168 8.547 3.447 9.898 5.407 9.898 C 6.768 9.898 7.598 9.363 7.934 8.431 C 8.06 8.078 8.243 7.892 8.618 7.892 L 9.33 7.892 C 9.746 7.892 9.994 8.125 9.923 8.538 C 9.598 10.433 7.834 11.74 5.409 11.74 L 5.407 11.738 C 2.168 11.738 0 9.424 0 5.797 C 0 2.169 2.135 0 5.224 0 Z M 5.222 1.74 C 3.494 1.74 2.405 2.818 2.074 4.64 L 8.282 4.64 C 8.054 2.842 6.949 1.74 5.222 1.74 Z" fill="rgb(29, 28, 27)" height="11.739799999999999px" id="PKmyQkwJE" transform="translate(104.541 12.325)" width="10.295000000000002px"/><path d="M 4.459 11.194 C 4.099 11.194 3.877 11.039 3.746 10.703 L 0.091 1.021 C -0.024 0.72 -0.031 0.511 0.076 0.297 C 0.178 0.094 0.381 0 0.732 0 L 1.274 0 C 1.633 0 1.86 0.155 1.986 0.495 L 4.958 8.503 L 5.123 9.018 L 5.289 8.503 L 8.262 0.495 C 8.388 0.155 8.615 0 8.974 0 L 9.517 0 C 9.865 0 10.07 0.092 10.172 0.297 C 10.279 0.511 10.275 0.72 10.157 1.021 L 6.502 10.703 C 6.371 11.039 6.149 11.194 5.79 11.194 Z" fill="rgb(29, 28, 27)" height="11.1941px" id="uUQr5Yl4B" transform="translate(93.807 12.595)" width="10.248961642504256px"/><path d="M 5.407 11.738 C 2.167 11.738 0 9.424 0 5.797 C 0 2.169 2.133 0 5.221 0 C 8.31 0 10.292 2.255 10.292 5.456 L 10.292 5.694 C 10.292 6.098 10.075 6.316 9.672 6.316 L 1.995 6.316 C 2.165 8.547 3.446 9.898 5.404 9.898 C 6.768 9.898 7.596 9.363 7.931 8.431 C 8.058 8.078 8.241 7.892 8.615 7.892 L 9.328 7.892 C 9.744 7.892 9.992 8.125 9.918 8.538 C 9.593 10.433 7.829 11.74 5.404 11.74 Z M 8.282 4.64 C 8.053 2.842 6.949 1.74 5.221 1.74 C 3.494 1.74 2.405 2.818 2.074 4.64 Z" fill="rgb(29, 28, 27)" height="11.739799999999999px" id="zo1nSBuSF" transform="translate(78.397 12.325)" width="10.29249999999999px"/><path d="M 3.057 10.677 C 3.163 11.026 3.392 11.192 3.756 11.192 L 3.749 11.194 L 4.987 11.194 C 5.35 11.194 5.579 11.028 5.69 10.679 L 8.173 2.654 L 8.237 2.401 L 8.3 2.654 L 10.787 10.679 C 10.894 11.028 11.123 11.194 11.487 11.194 L 12.733 11.194 C 13.096 11.194 13.325 11.028 13.432 10.679 L 16.418 1.006 C 16.516 0.7 16.512 0.498 16.41 0.288 C 16.307 0.089 16.109 0.002 15.76 0.002 L 15.218 0.002 C 14.848 0.002 14.626 0.168 14.519 0.522 L 12.094 8.547 L 12.046 8.761 L 11.999 8.542 L 9.506 0.517 C 9.4 0.168 9.171 0.002 8.807 0.002 L 7.683 0.002 C 7.319 0.002 7.091 0.168 6.984 0.517 L 4.492 8.542 L 4.449 8.745 L 4.405 8.551 L 1.98 0.519 C 1.874 0.166 1.649 0 1.281 0 L 0.728 0 C 0.38 0 0.181 0.087 0.079 0.286 C -0.021 0.493 -0.028 0.698 0.07 1.004 Z" fill="rgb(29, 28, 27)" height="11.194099999999999px" id="uboloLX99" transform="translate(61.282 12.598)" width="16.489163442184434px"/></svg>)
Tutorials
Building a Video Content Quiz Generator with Twelve Labs

Hrishikesh Yadav
This tutorial walks through building the Video Content MCQ Generator, which uses the Twelve Labs Pegasus model to automatically generate multiple choice questions from any indexed video, with a Streamlit interface for uploading videos, answering questions, and displaying scored results.
This tutorial walks through building the Video Content MCQ Generator, which uses the Twelve Labs Pegasus model to automatically generate multiple choice questions from any indexed video, with a Streamlit interface for uploading videos, answering questions, and displaying scored results.

In this article
No headings found on page
Join our newsletter
Join our newsletter
Receive the latest advancements, tutorials, and industry insights in video understanding
Receive the latest advancements, tutorials, and industry insights in video understanding
Search, analyze, and explore your videos with AI.
Oct 4, 2024
13 Min
Copy link to article
Imagine a world where every video becomes an interactive quiz, effortlessly transforming passive viewing into active learning 🎓
In this tutorial, we'll explore the Video Content Quiz Generator, an application designed to revolutionize the learning experience associated with video content. Powered by Twelve Labs, this video-based tool automatically generates Multiple Choice Questions (MCQs) from video content, enhancing both learning and assessment.
Whether you're an educator seeking quick assessments or a content creator aiming to boost engagement, the Video Content MCQ Generator is your ally in fostering active learning.
You can explore the demo of the application here: Video Content MCQ Generator. You can play with it via this Replit template.
Prerequisites
Generate an API key by signing up at the Twelve Labs Playground.
Find the repository for the notebooks and this application on GitHub.
How the Application Works
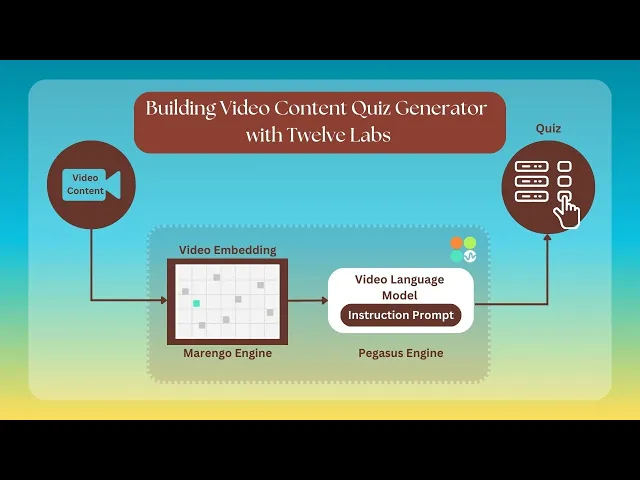
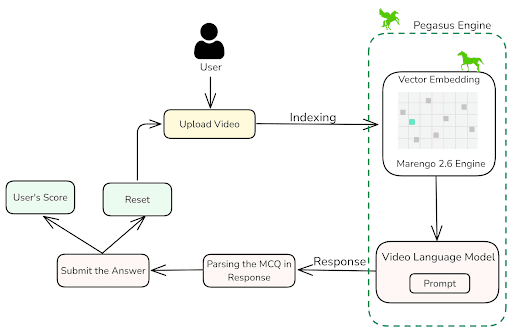
This section outlines the application flow for developing the video content quiz (MCQ) generator using Twelve Labs.
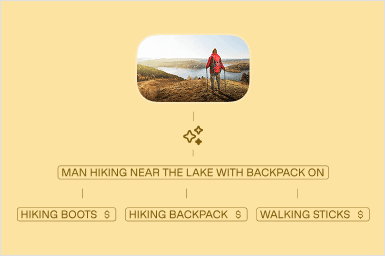
The process begins when a user uploads video or educational content, which is then transformed into an active quiz assessment. After upload, the video is indexed on a specific index created during setup. Indexing is performed using Marengo 2.6 (Embedding Engine). Once indexed, the video content is converted into MCQs using the open-ended prompt functionality in Pegasus 1.1 (Generative Engine).
The prompt assigns the role of an educational video analyzer, tasked with generating quiz questions and correct answers. These are used to evaluate user responses based on the indexed video, following a specified format. After a user submits an answer, the application provides a score and the correct answer. A reset button allows users to start over.
Preparation Steps
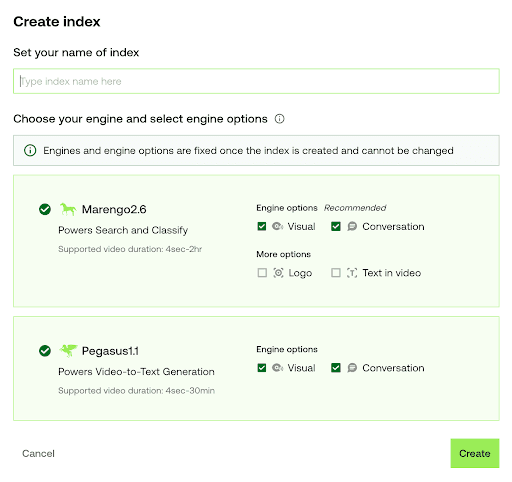
There are two ways to create the index: through the Twelve Labs Playground or using provided code snippets. We'll discuss both methods. To prepare the index ID from the playground, follow these steps:
Sign up and create an Index on the Twelve Labs Playground.
Enable the following video understanding engines for your index: (these engines provide a robust foundation for video understanding)
Marengo 2.6 (Embedding Engine) for video search and classification
Pegasus 1.1 (Generative Engine) for video-to-text generation
Obtain your API Key from the Twelve Labs Playground.
Retrieve your INDEX_ID by opening the Index created in step 1. The ID is in the URL: https://playground.twelvelabs.io/indexes/{index_id}.
Set up the .env file with your API Key and INDEX_ID, along with the main file.
Twelvelabs_API=your_api_key_here
API_URL=your_api_url_here
If you prefer the code-based approach, follow these steps:
Obtain your API Key from the Twelve Labs Playground and prepare the environment variable.
Import the Twelve Labs SDK and the environmental variables. Initiate the SDK client using the Twelve Labs API Key from the environment variable.
from twelvelabs import TwelveLabs
from dotenv import load_dotenv

load_dotenv()

API_KEY = os.getenv("API_KEY")
client = TwelveLabs(api_key=API_KEY)
Specifying the desired engine for the generation task:
engines = [
        {
          "name": "marengo2.6",
          "options": ["visual", "conversation", "text_in_video", "logo"]
        },
        {
            "name": "pegasus1.1",
            "options": ["visual", "conversation"]
        }
    ]
Create a new index by calling
client.indexwith the Index name and engine configuration parameters. Use a unique and identifiable name for the Index.
index = client.index.create(
    name="<YOUR_INDEX_NAME>",
    engines=engines
)
print(f"A new index has been created: Index id={index.id} name={index.name} engines={index.engines}")
The index.id field represents the unique identifier of your new index. This identifier is crucial for indexing videos in their correct location.
With these steps completed, you're now ready to develop the application!
Walkthrough for Video Content Quiz Generator
In this tutorial, we will build a Streamit application with a minimal frontend. Below is the directory structure to be followed:
.
├── app.py
├── requirements.txt
├── utils.py
├── .env
└── .gitignore
After completing the previous steps, it's time to build the Streamlit application. This app offers a straightforward way to upload a video and convert it into a multiple-choice quiz assessment. The application comprises two files:
app.py: Contains the application flow with a minimal page layout
utils.py: Contains all the utility functions essential for the application's operation
1 - Setting up the utility function for the operation
In this section, we'll explore how to set up the utility function using the Twelve Labs SDK to transform video content into interactive learning experiences. This AI-powered system enables educators and content creators to craft engaging assessments based on visual content by automating video analysis and quiz generation. The code combines video indexing and custom prompt engineering to generate relevant multiple-choice questions from any uploaded video, making it a versatile tool for creating interactive learning materials.
# Import the necessary libraries
import json
import tempfile
import os
from twelvelabs import TwelveLabs
from twelvelabs.models.task import Task
import re
from dotenv import load_dotenv


load_dotenv()

# Get the API Key from the Dashboard - https://playground.twelvelabs.io/dashboard/api-key
API_KEY = os.getenv("API_KEY")

# Create the INDEX ID as specified in the README.md and get the INDEX_ID
INDEX_ID = os.getenv("INDEX_ID")

# Initialize the Twelve Labs client
client = TwelveLabs(api_key=API_KEY)

# Create a temporary directory for uploaded files
UPLOAD_DIR = tempfile.mkdtemp()

def create_task(file_path):

    # Create a new task for video indexing
    return client.task.create(
        index_id=INDEX_ID,
        file=file_path,
    )

def on_task_update(task: Task):
    # Callback function to print task status updates
    print(f" Status={task.status}")

def wait_for_task(task):

    # Wait for the indexing task to complete
    task.wait_for_done(sleep_interval=5, callback=on_task_update)
    if task.status != "ready":
        raise RuntimeError(f"Indexing failed with status {task.status}")
    return task.video_id

def generate_mcq(video_id):
    # Prompt to generate the multiple choice questions based on video content
    prompt = """You're Educational Content Analyzer, and you are tasked to prepare the three Multiple Choice Questions based on the video content and the concept which is been discussed by the speaker or shown. The difficulty of the question should also gradually increase.

    The response should be in the json format where there is Q1, Q2, and Q3. Each section would contain the question with options in question and the correct_answer"""


    # Twelve Labs SDK to generate text based on the video content
    gist_r = client.generate.text(
        video_id=video_id,
        prompt=prompt
    )
    return gist_r.data

def parse_json_with_regex(text):

    # Extract and parse JSON content from the response
    match = re.search(r'\{[\s\S]*\}', text)

    if match:
        json_str = match.group(0)
        try:
            return json.loads(json_str)
        except json.JSONDecodeError:

            # Return None if JSON parsing fails
            return None
    else:
        # Return None if no JSON like content is found
        return None

def save_uploaded_file(uploaded_file):

    # Save the uploaded file to the temporary directory
    file_path = os.path.join(UPLOAD_DIR, uploaded_file.name)
    with open(file_path, "wb") as f:
        f.write(uploaded_file.getbuffer())
    return file_path


# Calculate the user's score based on their answers
def calculate_score(user_answers, questions):
    return sum(answer == questions[q_num]["correct_answer"] for q_num, answer in user_answers.items())
First, we import the necessary modules, including json, tempfile, os, and the Twelve Labs SDK, along with the API Key and Index ID environment variables.
The
create_task(file_path)method initiates a new video indexing task using the Twelve Labs SDK. It returns the work object for the indexing application. A callback function,on_task_update(task: Task), prints status updates for the indexing task. Once the status becomes "ready" and returns the video_id, thegenerate_mcq(video_id)function is triggered.The
generate_mcq(video_id)function generates multiple-choice questions based on the indexed content using Pegasus 1.1. The prompt defines the model's role, objective, and output format. The result is then parsed usingparse_json_with_regex(text).The
calculate_score(user_answers, questions)function computes the user's score based on their answers and returns the total score when the user clicks the submit button in the next section.
2. Instruction Flow of the Streamlit Application
2.1 Quiz Assessment Instruction Flow
As mentioned earlier, app.py contains the proper flow of instructions for the Streamlit application, utilizing the utility functions from utils.py. This section focuses on the function and flow of the quiz assessment and scoring system.
# Import the necessary libraries and functions import streamlit as st from utils import create_task, wait_for_task, generate_mcq, parse_json_with_regex, save_uploaded_file, calculate_score def upload_and_index(): # Minimal custom HTML and CSS st.markdown(""" <h1 style='text-align: center; color: #2c3e50; font-size: 36px; font-weight: bold; margin-bottom: 30px;'> 📹 Video Content Quiz Generator </h1> """, unsafe_allow_html=True) st.write("Upload a video to start the quiz generation process and test yourself!") # # Check if a video has already been indexed if 'video_id' in st.session_state and st.session_state.video_id: st.info("Video already indexed. Next, Proceeding to quiz generation.") return generate_quiz() # File uploader for video files uploaded_file = st.file_uploader("Choose a video file", type=['mp4']) if uploaded_file is not None: # Save the uploaded file file_path = save_uploaded_file(uploaded_file) st.success("File uploaded successfully!") # To proceed witht the indexing of the video with st.spinner("Indexing video... Please wait"): task = create_task(file_path) video_id = wait_for_task(task) st.success("Video indexed successfully!") st.session_state.video_id = video_id return generate_quiz() # Utility function to generate the quiz questions based on the indexed video def generate_quiz(): with st.spinner("Generating quiz questions..."): raw_response = generate_mcq(st.session_state.video_id) questions = parse_json_with_regex(raw_response) if questions: st.session_state.questions = questions st.session_state.page = "quiz" st.experimental_rerun() else: st.error("Failed to generate quiz questions. Please try again.") def quiz(): st.title("🎓 Video Content Quiz") st.write("Answer the following questions based on the video content -") questions = st.session_state.questions # # Initialize user answers if not already done if 'user_answers' not in st.session_state: st.session_state.user_answers = {q_num: None for q_num in questions} if 'submitted' not in st.session_state: st.session_state.submitted = False # Display the questions and answer options for q_num, q_data in questions.items(): with st.container(): st.subheader(f"Question {q_num[-1]}") st.write(q_data["question"]) answer = st.radio( f"Select your answer for Question {q_num[-1]}:", options=q_data["options"], key=f"select_{q_num}", index=q_data["options"].index(st.session_state.user_answers[q_num]) if st.session_state.user_answers[q_num] else 0, on_change=update_answer, args=(q_num,) ) st.markdown("---") # Submit quiz button col1, col2, col3 = st.columns([1, 2, 1]) with col2: submit_button = st.button("Submit Quiz 📝", key="submit_quiz", use_container_width=True) if submit_button: submit_quiz() st.balloons() # Display results if quiz is submitted if st.session_state.submitted: display_results() start_over_button = st.button("Start Over 🔄", key="start_over", use_container_width=True) if start_over_button: reset_state() def update_answer(q_num): # Session state, to update the user's answer st.session_state.user_answers[q_num] = st.session_state[f"select_{q_num}"] def submit_quiz(): # On the submission button, mark quiz as submitted and calculate score st.session_state.submitted = True st.session_state.score = calculate_score(st.session_state.user_answers, st.session_state.questions) def display_results(): # To display the user's score st.success(f"🏆 Your score: {st.session_state.score} out of {len(st.session_state.questions)}") # Display the correct results for each question for q_num, q_data in st.session_state.questions.items(): with st.expander(f"Question {q_num[-1]} Details"): st.write(f"**Your answer:** {st.session_state.user_answers[q_num]}") st.write(f"**Correct answer:** {q_data['correct_answer']}") if st.session_state.user_answers[q_num] == q_data['correct_answer']: st.success("Correct! 🎉") else: st.error("Incorrect ❌") def reset_state(): # Clear all session state variables for key in list(st.session_state.keys()): del st.session_state[key] st.experimental_rerun()
This part of the Streamlit application focuses on generating quizzes from video content and managing quiz interactions.
The upload_and_index() function utilizes the Twelve Labs SDK for video uploading and indexing. Once indexing is complete, the quiz generation process begins.
To generate quiz questions, the function uses the 'video_id' of the indexed video. It then calls generate_mcq() followed by parse_json_with_regex(), as previously discussed. This process creates the Quiz Questions and Answers. Upon successful generation, the quiz page is displayed.
The quiz() function presents the generated quiz and handles user interactions, including answer selection and quiz submission. A "Start Over" option is provided after submission. Several utility functions manage quiz interactions:
update_answer()updates the user's response for a specific question.submit_quiz()processes quiz submission and calculates the score.display_results()shows the quiz results, including the score and correct answers.reset_state()clears all session state variables to restart the quiz.
2.2 Streamlit Session State and Custom CSS
The main function in the app.py package configures the Streamlit page and applies custom CSS. It sets the background image, styles buttons, and determines the overall look of the application. It also initializes the session state.
def main(): # Set up the Streamlit page configuration st.set_page_config(page_title="QnA Generator", page_icon="🎥", layout="wide") # Custom CSS st.markdown(""" <style> .stApp { background-color: #f0f2f6; } .stButton > button { background-color: #4CAF50; color: white; font-weight: bold; border-radius: 30px; padding: 15px 30px; font-size: 18px; transition: all 0.3s ease 0s; border: none; box-shadow: 0 4px 6px rgba(0, 0, 0, 0.1); } .stButton > button:hover { background-color: #45a049; box-shadow: 0 6px 8px rgba(0, 0, 0, 0.15); transform: translateY(-2px); } .stButton > button:active { transform: translateY(0px); box-shadow: 0 2px 4px rgba(0, 0, 0, 0.1); } .stRadio > label { background-color: #e1e5eb; padding: 12px; border-radius: 8px; margin-bottom: 12px; transition: all 0.2s ease 0s; cursor: pointer; } .stRadio > label:hover { background-color: #d0d4d9; transform: translateY(-2px); box-shadow: 0 4px 6px rgba(0, 0, 0, 0.1); } .stExpander { background-color: #ffffff; border-radius: 15px; box-shadow: 0 4px 6px rgba(0, 0, 0, 0.1); margin-bottom: 20px; } h1 { color: #2c3e50; font-size: 36px; font-weight: bold; margin-bottom: 20px; } h2, h3 { color: #34495e; } .stAlert { border-radius: 10px; font-weight: bold; } .stSpinner > div { border-color: #4CAF50 !important; } [data-testid="stAppViewContainer"] { background-image: url("https://img.freepik.com/free-photo/vivid-blurred-colorful-wallpaper-background_58702-3508.jpg?size=626&ext=jpg"); background-size: cover; } [data-testid="stHeader"] { background-color: rgba(0,0,0,0); } [data-testid="stToolbar"] { right: 2rem; background-image: url(""); background-size: cover; } </style> """, unsafe_allow_html=True) # Initialize the page state if not already set if 'page' not in st.session_state: st.session_state.page = "upload" # To show the appropriate page based on the current state if st.session_state.page == "upload": upload_and_index() elif st.session_state.page == "quiz": quiz() if __name__ == "__main__": main()
Serving as the entry point for launching the Streamlit application, the main() function sets up a page with a title and uses a wide layout for better space utilization. Custom CSS enhances visual appeal by stylizing the background, buttons, radio buttons, and expanders, while reducing the opacity of headings.
To manage navigation between different sections of the app, a session state variable 'page' is initialized. It's set to "upload" by default if not already defined.
The application renders various pages based on its current state using conditional statements:
"upload" — Calls the
upload_and_index()function for the video upload interface."quiz" — Calls the
quiz()function to display the generated quiz.
Here's a demo quiz generated after uploading and indexing the video content on the PCA topic:

Explore further by experimenting with the open-ended prompt and Pegasus 1.1, powered by Twelve Labs.
More Ideas to Experiment with the Tutorial
Understanding how an application works and its development process empowers you to implement innovative ideas and create products that meet users' needs. Here are some use cases similar to the tutorial blog:
📚️ Self-Paced Learning: Students can generate questions to test their understanding of video lessons.
🎓 Educational Assessment: Teachers can quickly create quizzes based on lecture videos or educational content.
🏢️ Corporate Training: Organizations can enhance their video-based training programs with automated assessments tailored to different learners.
🎬 Content Engagement: Video content creators, including YouTubers, can increase engagement by providing interactive quizzes for their content.
🧠 Memory Retention: Users can reinforce their learning by answering questions generated from informational videos.
Conclusion
This blog post offers a comprehensive explanation of the working procedure and development of the video content quiz generator using Twelve Labs. We appreciate you following along with the tutorial and look forward to your ideas on improving the user experience and addressing various challenges.
Additional Resources
To deepen your understanding of the engines used for the generation task, check out Marengo 2.6 (Embedding Engine) and Pegasus 1.1 (Generator Engine). To further explore Twelve Labs and enhance your grasp of video content analysis, consider these valuable resources:
Discord Community: Join our vibrant community of developers and enthusiasts to discuss ideas, ask questions, and share your projects.
Sample Applications: Explore a variety of sample applications to inspire your next project or learn new implementation techniques.
Explore Tutorials: Dive deeper into Twelve Labs capabilities with our comprehensive tutorials.
We encourage you to leverage these resources to expand your knowledge and create innovative applications using Twelve Labs' video understanding technology.
Imagine a world where every video becomes an interactive quiz, effortlessly transforming passive viewing into active learning 🎓
In this tutorial, we'll explore the Video Content Quiz Generator, an application designed to revolutionize the learning experience associated with video content. Powered by Twelve Labs, this video-based tool automatically generates Multiple Choice Questions (MCQs) from video content, enhancing both learning and assessment.
Whether you're an educator seeking quick assessments or a content creator aiming to boost engagement, the Video Content MCQ Generator is your ally in fostering active learning.
You can explore the demo of the application here: Video Content MCQ Generator. You can play with it via this Replit template.
Prerequisites
Generate an API key by signing up at the Twelve Labs Playground.
Find the repository for the notebooks and this application on GitHub.
How the Application Works
This section outlines the application flow for developing the video content quiz (MCQ) generator using Twelve Labs.
The process begins when a user uploads video or educational content, which is then transformed into an active quiz assessment. After upload, the video is indexed on a specific index created during setup. Indexing is performed using Marengo 2.6 (Embedding Engine). Once indexed, the video content is converted into MCQs using the open-ended prompt functionality in Pegasus 1.1 (Generative Engine).
The prompt assigns the role of an educational video analyzer, tasked with generating quiz questions and correct answers. These are used to evaluate user responses based on the indexed video, following a specified format. After a user submits an answer, the application provides a score and the correct answer. A reset button allows users to start over.
Preparation Steps
There are two ways to create the index: through the Twelve Labs Playground or using provided code snippets. We'll discuss both methods. To prepare the index ID from the playground, follow these steps:
Sign up and create an Index on the Twelve Labs Playground.
Enable the following video understanding engines for your index: (these engines provide a robust foundation for video understanding)
Marengo 2.6 (Embedding Engine) for video search and classification
Pegasus 1.1 (Generative Engine) for video-to-text generation
Obtain your API Key from the Twelve Labs Playground.
Retrieve your INDEX_ID by opening the Index created in step 1. The ID is in the URL: https://playground.twelvelabs.io/indexes/{index_id}.
Set up the .env file with your API Key and INDEX_ID, along with the main file.
Twelvelabs_API=your_api_key_here
API_URL=your_api_url_here
If you prefer the code-based approach, follow these steps:
Obtain your API Key from the Twelve Labs Playground and prepare the environment variable.
Import the Twelve Labs SDK and the environmental variables. Initiate the SDK client using the Twelve Labs API Key from the environment variable.
from twelvelabs import TwelveLabs
from dotenv import load_dotenv

load_dotenv()

API_KEY = os.getenv("API_KEY")
client = TwelveLabs(api_key=API_KEY)
Specifying the desired engine for the generation task:
engines = [
        {
          "name": "marengo2.6",
          "options": ["visual", "conversation", "text_in_video", "logo"]
        },
        {
            "name": "pegasus1.1",
            "options": ["visual", "conversation"]
        }
    ]
Create a new index by calling
client.indexwith the Index name and engine configuration parameters. Use a unique and identifiable name for the Index.
index = client.index.create(
    name="<YOUR_INDEX_NAME>",
    engines=engines
)
print(f"A new index has been created: Index id={index.id} name={index.name} engines={index.engines}")
The index.id field represents the unique identifier of your new index. This identifier is crucial for indexing videos in their correct location.
With these steps completed, you're now ready to develop the application!
Walkthrough for Video Content Quiz Generator
In this tutorial, we will build a Streamit application with a minimal frontend. Below is the directory structure to be followed:
.
├── app.py
├── requirements.txt
├── utils.py
├── .env
└── .gitignore
After completing the previous steps, it's time to build the Streamlit application. This app offers a straightforward way to upload a video and convert it into a multiple-choice quiz assessment. The application comprises two files:
app.py: Contains the application flow with a minimal page layout
utils.py: Contains all the utility functions essential for the application's operation
1 - Setting up the utility function for the operation
In this section, we'll explore how to set up the utility function using the Twelve Labs SDK to transform video content into interactive learning experiences. This AI-powered system enables educators and content creators to craft engaging assessments based on visual content by automating video analysis and quiz generation. The code combines video indexing and custom prompt engineering to generate relevant multiple-choice questions from any uploaded video, making it a versatile tool for creating interactive learning materials.
# Import the necessary libraries
import json
import tempfile
import os
from twelvelabs import TwelveLabs
from twelvelabs.models.task import Task
import re
from dotenv import load_dotenv


load_dotenv()

# Get the API Key from the Dashboard - https://playground.twelvelabs.io/dashboard/api-key
API_KEY = os.getenv("API_KEY")

# Create the INDEX ID as specified in the README.md and get the INDEX_ID
INDEX_ID = os.getenv("INDEX_ID")

# Initialize the Twelve Labs client
client = TwelveLabs(api_key=API_KEY)

# Create a temporary directory for uploaded files
UPLOAD_DIR = tempfile.mkdtemp()

def create_task(file_path):

    # Create a new task for video indexing
    return client.task.create(
        index_id=INDEX_ID,
        file=file_path,
    )

def on_task_update(task: Task):
    # Callback function to print task status updates
    print(f" Status={task.status}")

def wait_for_task(task):

    # Wait for the indexing task to complete
    task.wait_for_done(sleep_interval=5, callback=on_task_update)
    if task.status != "ready":
        raise RuntimeError(f"Indexing failed with status {task.status}")
    return task.video_id

def generate_mcq(video_id):
    # Prompt to generate the multiple choice questions based on video content
    prompt = """You're Educational Content Analyzer, and you are tasked to prepare the three Multiple Choice Questions based on the video content and the concept which is been discussed by the speaker or shown. The difficulty of the question should also gradually increase.

    The response should be in the json format where there is Q1, Q2, and Q3. Each section would contain the question with options in question and the correct_answer"""


    # Twelve Labs SDK to generate text based on the video content
    gist_r = client.generate.text(
        video_id=video_id,
        prompt=prompt
    )
    return gist_r.data

def parse_json_with_regex(text):

    # Extract and parse JSON content from the response
    match = re.search(r'\{[\s\S]*\}', text)

    if match:
        json_str = match.group(0)
        try:
            return json.loads(json_str)
        except json.JSONDecodeError:

            # Return None if JSON parsing fails
            return None
    else:
        # Return None if no JSON like content is found
        return None

def save_uploaded_file(uploaded_file):

    # Save the uploaded file to the temporary directory
    file_path = os.path.join(UPLOAD_DIR, uploaded_file.name)
    with open(file_path, "wb") as f:
        f.write(uploaded_file.getbuffer())
    return file_path


# Calculate the user's score based on their answers
def calculate_score(user_answers, questions):
    return sum(answer == questions[q_num]["correct_answer"] for q_num, answer in user_answers.items())
First, we import the necessary modules, including json, tempfile, os, and the Twelve Labs SDK, along with the API Key and Index ID environment variables.
The
create_task(file_path)method initiates a new video indexing task using the Twelve Labs SDK. It returns the work object for the indexing application. A callback function,on_task_update(task: Task), prints status updates for the indexing task. Once the status becomes "ready" and returns the video_id, thegenerate_mcq(video_id)function is triggered.The
generate_mcq(video_id)function generates multiple-choice questions based on the indexed content using Pegasus 1.1. The prompt defines the model's role, objective, and output format. The result is then parsed usingparse_json_with_regex(text).The
calculate_score(user_answers, questions)function computes the user's score based on their answers and returns the total score when the user clicks the submit button in the next section.
2. Instruction Flow of the Streamlit Application
2.1 Quiz Assessment Instruction Flow
As mentioned earlier, app.py contains the proper flow of instructions for the Streamlit application, utilizing the utility functions from utils.py. This section focuses on the function and flow of the quiz assessment and scoring system.
# Import the necessary libraries and functions import streamlit as st from utils import create_task, wait_for_task, generate_mcq, parse_json_with_regex, save_uploaded_file, calculate_score def upload_and_index(): # Minimal custom HTML and CSS st.markdown(""" <h1 style='text-align: center; color: #2c3e50; font-size: 36px; font-weight: bold; margin-bottom: 30px;'> 📹 Video Content Quiz Generator </h1> """, unsafe_allow_html=True) st.write("Upload a video to start the quiz generation process and test yourself!") # # Check if a video has already been indexed if 'video_id' in st.session_state and st.session_state.video_id: st.info("Video already indexed. Next, Proceeding to quiz generation.") return generate_quiz() # File uploader for video files uploaded_file = st.file_uploader("Choose a video file", type=['mp4']) if uploaded_file is not None: # Save the uploaded file file_path = save_uploaded_file(uploaded_file) st.success("File uploaded successfully!") # To proceed witht the indexing of the video with st.spinner("Indexing video... Please wait"): task = create_task(file_path) video_id = wait_for_task(task) st.success("Video indexed successfully!") st.session_state.video_id = video_id return generate_quiz() # Utility function to generate the quiz questions based on the indexed video def generate_quiz(): with st.spinner("Generating quiz questions..."): raw_response = generate_mcq(st.session_state.video_id) questions = parse_json_with_regex(raw_response) if questions: st.session_state.questions = questions st.session_state.page = "quiz" st.experimental_rerun() else: st.error("Failed to generate quiz questions. Please try again.") def quiz(): st.title("🎓 Video Content Quiz") st.write("Answer the following questions based on the video content -") questions = st.session_state.questions # # Initialize user answers if not already done if 'user_answers' not in st.session_state: st.session_state.user_answers = {q_num: None for q_num in questions} if 'submitted' not in st.session_state: st.session_state.submitted = False # Display the questions and answer options for q_num, q_data in questions.items(): with st.container(): st.subheader(f"Question {q_num[-1]}") st.write(q_data["question"]) answer = st.radio( f"Select your answer for Question {q_num[-1]}:", options=q_data["options"], key=f"select_{q_num}", index=q_data["options"].index(st.session_state.user_answers[q_num]) if st.session_state.user_answers[q_num] else 0, on_change=update_answer, args=(q_num,) ) st.markdown("---") # Submit quiz button col1, col2, col3 = st.columns([1, 2, 1]) with col2: submit_button = st.button("Submit Quiz 📝", key="submit_quiz", use_container_width=True) if submit_button: submit_quiz() st.balloons() # Display results if quiz is submitted if st.session_state.submitted: display_results() start_over_button = st.button("Start Over 🔄", key="start_over", use_container_width=True) if start_over_button: reset_state() def update_answer(q_num): # Session state, to update the user's answer st.session_state.user_answers[q_num] = st.session_state[f"select_{q_num}"] def submit_quiz(): # On the submission button, mark quiz as submitted and calculate score st.session_state.submitted = True st.session_state.score = calculate_score(st.session_state.user_answers, st.session_state.questions) def display_results(): # To display the user's score st.success(f"🏆 Your score: {st.session_state.score} out of {len(st.session_state.questions)}") # Display the correct results for each question for q_num, q_data in st.session_state.questions.items(): with st.expander(f"Question {q_num[-1]} Details"): st.write(f"**Your answer:** {st.session_state.user_answers[q_num]}") st.write(f"**Correct answer:** {q_data['correct_answer']}") if st.session_state.user_answers[q_num] == q_data['correct_answer']: st.success("Correct! 🎉") else: st.error("Incorrect ❌") def reset_state(): # Clear all session state variables for key in list(st.session_state.keys()): del st.session_state[key] st.experimental_rerun()
This part of the Streamlit application focuses on generating quizzes from video content and managing quiz interactions.
The upload_and_index() function utilizes the Twelve Labs SDK for video uploading and indexing. Once indexing is complete, the quiz generation process begins.
To generate quiz questions, the function uses the 'video_id' of the indexed video. It then calls generate_mcq() followed by parse_json_with_regex(), as previously discussed. This process creates the Quiz Questions and Answers. Upon successful generation, the quiz page is displayed.
The quiz() function presents the generated quiz and handles user interactions, including answer selection and quiz submission. A "Start Over" option is provided after submission. Several utility functions manage quiz interactions:
update_answer()updates the user's response for a specific question.submit_quiz()processes quiz submission and calculates the score.display_results()shows the quiz results, including the score and correct answers.reset_state()clears all session state variables to restart the quiz.
2.2 Streamlit Session State and Custom CSS
The main function in the app.py package configures the Streamlit page and applies custom CSS. It sets the background image, styles buttons, and determines the overall look of the application. It also initializes the session state.
def main(): # Set up the Streamlit page configuration st.set_page_config(page_title="QnA Generator", page_icon="🎥", layout="wide") # Custom CSS st.markdown(""" <style> .stApp { background-color: #f0f2f6; } .stButton > button { background-color: #4CAF50; color: white; font-weight: bold; border-radius: 30px; padding: 15px 30px; font-size: 18px; transition: all 0.3s ease 0s; border: none; box-shadow: 0 4px 6px rgba(0, 0, 0, 0.1); } .stButton > button:hover { background-color: #45a049; box-shadow: 0 6px 8px rgba(0, 0, 0, 0.15); transform: translateY(-2px); } .stButton > button:active { transform: translateY(0px); box-shadow: 0 2px 4px rgba(0, 0, 0, 0.1); } .stRadio > label { background-color: #e1e5eb; padding: 12px; border-radius: 8px; margin-bottom: 12px; transition: all 0.2s ease 0s; cursor: pointer; } .stRadio > label:hover { background-color: #d0d4d9; transform: translateY(-2px); box-shadow: 0 4px 6px rgba(0, 0, 0, 0.1); } .stExpander { background-color: #ffffff; border-radius: 15px; box-shadow: 0 4px 6px rgba(0, 0, 0, 0.1); margin-bottom: 20px; } h1 { color: #2c3e50; font-size: 36px; font-weight: bold; margin-bottom: 20px; } h2, h3 { color: #34495e; } .stAlert { border-radius: 10px; font-weight: bold; } .stSpinner > div { border-color: #4CAF50 !important; } [data-testid="stAppViewContainer"] { background-image: url("https://img.freepik.com/free-photo/vivid-blurred-colorful-wallpaper-background_58702-3508.jpg?size=626&ext=jpg"); background-size: cover; } [data-testid="stHeader"] { background-color: rgba(0,0,0,0); } [data-testid="stToolbar"] { right: 2rem; background-image: url(""); background-size: cover; } </style> """, unsafe_allow_html=True) # Initialize the page state if not already set if 'page' not in st.session_state: st.session_state.page = "upload" # To show the appropriate page based on the current state if st.session_state.page == "upload": upload_and_index() elif st.session_state.page == "quiz": quiz() if __name__ == "__main__": main()
Serving as the entry point for launching the Streamlit application, the main() function sets up a page with a title and uses a wide layout for better space utilization. Custom CSS enhances visual appeal by stylizing the background, buttons, radio buttons, and expanders, while reducing the opacity of headings.
To manage navigation between different sections of the app, a session state variable 'page' is initialized. It's set to "upload" by default if not already defined.
The application renders various pages based on its current state using conditional statements:
"upload" — Calls the
upload_and_index()function for the video upload interface."quiz" — Calls the
quiz()function to display the generated quiz.
Here's a demo quiz generated after uploading and indexing the video content on the PCA topic:
Explore further by experimenting with the open-ended prompt and Pegasus 1.1, powered by Twelve Labs.
More Ideas to Experiment with the Tutorial
Understanding how an application works and its development process empowers you to implement innovative ideas and create products that meet users' needs. Here are some use cases similar to the tutorial blog:
📚️ Self-Paced Learning: Students can generate questions to test their understanding of video lessons.
🎓 Educational Assessment: Teachers can quickly create quizzes based on lecture videos or educational content.
🏢️ Corporate Training: Organizations can enhance their video-based training programs with automated assessments tailored to different learners.
🎬 Content Engagement: Video content creators, including YouTubers, can increase engagement by providing interactive quizzes for their content.
🧠 Memory Retention: Users can reinforce their learning by answering questions generated from informational videos.
Conclusion
This blog post offers a comprehensive explanation of the working procedure and development of the video content quiz generator using Twelve Labs. We appreciate you following along with the tutorial and look forward to your ideas on improving the user experience and addressing various challenges.
Additional Resources
To deepen your understanding of the engines used for the generation task, check out Marengo 2.6 (Embedding Engine) and Pegasus 1.1 (Generator Engine). To further explore Twelve Labs and enhance your grasp of video content analysis, consider these valuable resources:
Discord Community: Join our vibrant community of developers and enthusiasts to discuss ideas, ask questions, and share your projects.
Sample Applications: Explore a variety of sample applications to inspire your next project or learn new implementation techniques.
Explore Tutorials: Dive deeper into Twelve Labs capabilities with our comprehensive tutorials.
We encourage you to leverage these resources to expand your knowledge and create innovative applications using Twelve Labs' video understanding technology.
Related articles


Platform
Enterprise
© 2021
-
2026
TwelveLabs, Inc. All Rights Reserved

Platform
Enterprise
© 2021
-
2026
TwelveLabs, Inc. All Rights Reserved


Platform
Enterprise
© 2021
-
2026
TwelveLabs, Inc. All Rights Reserved