WHAT OUR PARTNERS ARE SAYING
Building a Video AI Interview Analyzer with Twelve Labs

Hrishikesh Yadav
The AI Interview Analyzer is a powerful tool designed to revolutionize the interview preparation process and assist in the hiring of employees.
The AI Interview Analyzer is a powerful tool designed to revolutionize the interview preparation process and assist in the hiring of employees.

In this article
No headings found on page
Join our newsletter
Join our newsletter
Receive the latest advancements, tutorials, and industry insights in video understanding
Receive the latest advancements, tutorials, and industry insights in video understanding
Search, analyze, and explore your videos with AI.
Sep 21, 2024
11 Min
Copy link to article
Introduction
Imagine stepping into an interview room where your every gesture, word, and expression is not just observed, but understood. Welcome to the future of job interviews, where artificial intelligence becomes your personal coach and confidant. The AI Interview Analyzer is here, and it's about to revolutionize the process for both job seekers and recruiters alike.
In today's competitive job market, acing that crucial interview can make the difference between landing your dream job and watching it slip away. But what if you had a secret weapon? A tool that could analyze your performance, highlight your strengths, and gently suggest areas for improvement?
That's exactly what the AI Interview Analyzer offers, using the Pegasus-1 model from Twelve Labs to provide insights once exclusive to seasoned HR professionals.
You can explore the demo of the application here: Interview Analyzer Application. You can also play with it via this Replit template.
Prerequisites
Generate an API key by signing up at the Twelve Labs Playground.
Find the repository for the notebooks and this application on GitHub.
The Flask application in this tutorial makes use of Python, HTML, CSS and Javascript.
Working of the Application
This section outlines the application flow for developing and using the Twelve Labs Powered Interview Preparation Application.
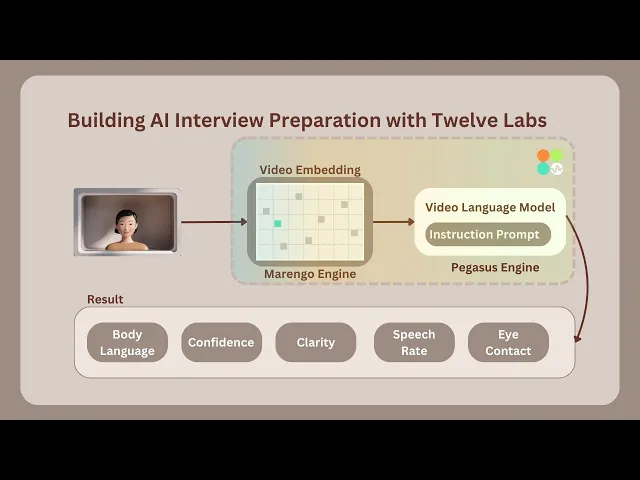
The interview process begins with random aptitude questions appearing for a limited time to prepare the user. Once the user finishes answering, the application automatically starts recording the interview for a set duration. After recording, the video is immediately processed and sent for indexing using the Marengo 2.6 (Embedding Engine).

According to the instruction prompting performed on Twelve Labs' Generative Engine, known as Pegasus 1.1, it analyzes and scores various parameters used to evaluate video interviews. These parameters include Confidence, Clarity, Eye Contact, Body Language, Speech Rate, and Voice Tone. Additionally, it notes down all the key points discussed during the interview. Companies or organizations can utilize this application to conduct automated interviews for numerous candidates, saving time. Alternatively, it can provide feedback on interview practice, helping users improve their performance.
Preparation Steps

Sign up and create an Index on the Twelve Labs Playground.
Choose the appropriate options for classification: (1) Marengo 2.6 (Embedding Engine) for video search and classification; or (2) Pegasus 1.1 for video-to-text generation. These engines provide a robust foundation for video understanding.
Obtain your API Key from the Twelve Labs Playground.
Retrieve your INDEX_ID by opening the Index created in step 1. The ID is in the URL: https://playground.twelvelabs.io/indexes/{index_id}.
Set up the
.envfile with your API Key and INDEX_ID, along with the main file.
Twelvelabs_API=your_api_key_here
API_URL=your_api_url_here
INDEX_ID=your_index_id_here
With these steps completed, you're now ready to dive in and develop the application!
Walkthrough for Building the AI Interview Analyzer
In this tutorial, we will build a Flask application with a minimal frontend. Below is the directory structure we will follow:
.
├── app.py
├── requirements.txt
├── static
│   ├── css
│   │   └── style.css
│   └── js
│       └── main.js
├── templates
│   └── index.html
└── uploads
1 - Preparing the Flask Application
1.1 - Setup of the Application - Verification, Processing and Serving Interview Question
The main Python code of the Flask container is found in the app.py file. To understand app.py, let's break it down into two parts: the setup and the upload route. The setup initializes the application, while the upload route interacts with the embedding and generative engine. Here's an overview of the setup part of app.py:
# Importing the necessary module
import os
import json
import random
from flask import Flask, render_template, request, jsonify
from twelvelabs import TwelveLabs
from twelvelabs.models.task import Task
import requests
from dotenv import load_dotenv

# Load environment variables
load_dotenv()

# Initialize the Flask app
app = Flask(__name__)

# Get the API credentials from env variables
API_KEY = os.getenv('API_KEY')
API_URL = os.getenv('API_URL')
index_id = os.getenv('index_id')

# Initialize TwelveLabs client
client = TwelveLabs(api_key=API_KEY)

# List of the Aptitude Interview Questions
INTERVIEW_QUESTIONS = [
    "Tell me about yourself.",
    "What are your greatest strengths?",
    "What do you consider to be your weaknesses?",
    "Where do you see yourself in five years?",
    "Why should we hire you?",
    "What motivates you?",
    "What are your career goals?",
    "How do you work in a team?",
    "What's your leadership style?"
]


# Utility function to check API connection
def check_api_connection():
    try:
        response = requests.get(API_URL, headers={"x-api-key": API_KEY})
        return response.status_code == 200
    except requests.RequestException as e:
        print(f"API connection check failed. Error: {str(e)}")
        return False

# Utitliy function to process API response
def process_api_response(data):
    # Initialize default processed data structure
    processed_data = {
        "confidence": "N/A",
        "clarity": "N/A",
        "speech_rate": "N/A",
        "eye_contact": "N/A",
        "body_language": "N/A",
        "voice_tone": "N/A",
        "imp_points": []
    }

    # Handling the string input (convert to dict, if possible)
    if isinstance(data, str):
        try:
            cleaned_data = data.replace("```json", "").replace("```", "").strip()
            data = json.loads(cleaned_data)
        except json.JSONDecodeError as e:
            print(f"Error decoding JSON - {e}")
            return processed_data

    # Extract data from dict
    if isinstance(data, dict):
        for key in processed_data.keys():
            processed_data[key] = data.get(key, "N/A")
    return processed_data

# Main Page Route
@app.route('/')
def index():
    return render_template('index.html')

# API route to get a random interview question from list
@app.route('/get_question')
def get_question():
    question = random.choice(INTERVIEW_QUESTIONS)
    return jsonify({"question": question})
In the setup, we initialize the client for the Twelve Labs SDK and the Response Processing utility. We also begin generating aptitude-based interview questions. The next crucial step is to examine the second half of the application, which focuses on its core functionality.
1.2 - Upload Route and Interaction with the Embedding and Generative Engine
# Route for upload
@app.route('/upload', methods=['POST'])
def upload():
    # Checking of the API connection before proceeding
    if not check_api_connection():
        return jsonify({"error": "Failed to connect to the Twelve Labs API."}), 500

    # Validate video file in request
    if 'video' not in request.files:
        return jsonify({"error": "No video file provided"}), 400
    video = request.files['video']
    if video.filename == '':
        return jsonify({"error": "No video file selected"}), 400

    # Save uploaded video file
    video_path = os.path.join('uploads', 'interview.mp4')
    video.save(video_path)

    # Verifying whether the video file was saved successfully
    if not os.path.exists(video_path):
        return jsonify({"error": "Failed to save video file"}), 500

    file_size = os.path.getsize(video_path)
    print(f"Uploaded video file size: {file_size} bytes")

    if file_size == 0:
        return jsonify({"error": "Uploaded video file is empty"}), 500

    try:

       # Create and wait for indexing task
        task = client.task.create(index_id=index_id, file=video_path)
        task.wait_for_done(sleep_interval=5)
        if task.status != "ready":
            return jsonify({"error": f"Indexing failed with status {task.status}"}), 500


        # Generate text analysis from the video
        result = client.generate.text(
            video_id=task.video_id,
            prompt="""You're an Interviewer, Analyze the video clip of the interview answer for the question - {question}.
            If the face is not present in the video then do provide the lower points in all categories, Do provide less than 5 for all the other categories if the face is not visible in the video.

            Do provide the response in the json format with the number assigned as the value.
            After analyzing from 1-10. The keys of the json as confidence, clarity, speech_rate, eye_contact, body_language, voice_tone, relevant_to_question, imp_points.
            The imp_points will contain the exact sentence in a summarized points by the speaker, also do remove the filler words and provide it in a list format which is important from video."""
        )

        # Process and return the API response
        print("Raw API Response:", json.dumps(result.data, indent=2))
        processed_data = process_api_response(result.data)
        print("Processed data:", json.dumps(processed_data, indent=2))
        return jsonify(processed_data), 200
    except Exception as e:

        # To Handle any errors during processing
        print(f"Error processing video: {str(e)}")
        return jsonify({"error": f"Error processing video: {str(e)}"}), 500


# Run the Flask app
if __name__ == '__main__':
    os.makedirs('uploads', exist_ok=True) # To ensure whether the uploads directory exists
    app.run(debug=True)
The Upload route handles the upload and processing of interview videos, leveraging the Twelve Labs API for video analysis. Once the video is saved, a task is created to index the video using Marengo 2.6 (Embedding Engine). The indexed video is then accessed by the /generate endpoint, powered by Pegasus 1.1 (Generative Engine).
The system analyzes the video and provides a response based on a brief prompt description. A prompt structure consists of three components: characteristics, objectives, and response format.
2 - Minimal Frontend Code for the Instruction Flow
The HTML structure of the AI Interview Analyzer web application is a single-page application with three main sections: start, interview, and result.
<!DOCTYPE html>
<html lang="en">
<head>
    <meta charset="UTF-8">
    <meta name="viewport" content="width=device-width, initial-scale=1.0">
    <title>AI Interview Analyzer</title>
    <link href="https://fonts.googleapis.com/css2?family=Inter:wght@300;400;600&display=swap" rel="stylesheet">
    <link rel="stylesheet" href="{{ url_for('static', filename='css/style.css') }}">
</head>
<body>
    <div class="container">
        <header>
            <h1>AI Interview Analyzer</h1>
            <p>Enhance Your Interview Skills with AI Powered Feedback</p>
        </header>
        <main>

            <section id="start-section" class="card">
                <h2>Ready to Start Your Interview?</h2>
                <p>Click the button below to begin your AI powered interview experience.</vp>
                <button id="startInterviewButton" class="btn btn-primary">Start Interview</button>
            </section>


            <section id="interview-section" class="card hidden">

                <div id="question-container">
                    <h2>Interview Question -</h2>
                    <p id="interview-question"></p>
                </div>

                <div id="timer-container">
                    <div id="preparation-timer" class="timer">
                        Preparation Time - <span id="prep-time">00:20</span>
                    </div>
                    <div id="recording-timer" class="timer hidden">
                        Recording Time - <span id="rec-time">00:30</span>
                    </div>
                </div>


                <div id="video-container" class="hidden">
                    <video id="videoElement" autoplay muted></video>
                </div>


                <div id="status-message" class="status"></div>
            </section>

            <section id="result-section" class="card hidden">

                <h2>Analysis Results</h2>
                <div id="result" class="result-container">
                    <div id="loading-message" class="loading">Analyzing your response...</div>
                    <small>It may take around 3-4 mins</small>
                </div>
            </section>
        </main>
    </div>
    <script src="{{ url_for('static', filename='js/main.js') }}"></script>
</body>
</html>
The minimal frontend sections are:
Start Section: The initial view users see when loading the page, containing a welcome message and a button to start the interview process.
Interview Section: Revealed when the interview starts, displaying the current question, timers for preparation and recording, and a video feed of the user.
Result Section: Displays the AI's analysis results after the interview is complete.
The structure outlines a step-by-step interview process, from beginning the interview to receiving AI feedback. Smooth transitions between interview stages are enabled by hidden classes, managed by the JavaScript code in main.js, which is explained below.
For the styling of the application, you can get the style.css from here.
3 - Recording Functionality and Error Handling in Javascript
The JavaScript snippet below is main.js, containing media recording settings for the browser environment, processing of analysis text results, and error handling.
document.addEventListener('DOMContentLoaded', () => { // Object to store all DOM elements const elements = { startButton: document.getElementById('startInterviewButton'), sections: { start: document.getElementById('start-section'), interview: document.getElementById('interview-section'), result: document.getElementById('result-section') }, video: document.getElementById('videoElement'), videoContainer: document.getElementById('video-container'), question: document.getElementById('interview-question'), timers: { prep: document.getElementById('preparation-timer'), rec: document.getElementById('recording-timer') }, timerDisplays: { prep: document.getElementById('prep-time'), rec: document.getElementById('rec-time') }, status: document.getElementById('status-message'), result: document.getElementById('result') }; // Variables for media recording let mediaRecorder; let recordedChunks = []; const prepTime = 20; // Interview Preparation time in seconds const recTime = 30; // Video Interview Recording time in seconds let currentTimer; // Function to set up camera and media recorder async function setupCamera() { try { // Request access to user's camera and microphone const stream = await navigator.mediaDevices.getUserMedia({ video: { width: 640, height: 480 }, audio: true }); elements.video.srcObject = stream; // Set up media recorder const options = { mimeType: 'video/mp4' }; mediaRecorder = new MediaRecorder(stream, options); // Event handler for when data is available mediaRecorder.ondataavailable = (event) => { if (event.data.size > 0) { recordedChunks.push(event.data); } }; // Event handler for when recording stops mediaRecorder.onstop = () => { const blob = new Blob(recordedChunks, { type: 'video/mp4' }); console.log('Recording stopped. Blob size:', blob.size, 'bytes'); if (blob.size > 0) { uploadVideo(blob); } else { showError("Recording failed: No data captured."); } }; } catch (error) { console.error('Error accessing camera:', error); showError('Unable to access camera. Please ensure you have given permission and try again.'); } } // Utility function to show a specific section and hide others function showSection(section) { Object.values(elements.sections).forEach(s => s.classList.add('hidden')); elements.sections[section].classList.remove('hidden'); } // Utility function to update timer display function updateTimer(timerElement, time) { const minutes = Math.floor(time / 60); const seconds = time % 60; timerElement.textContent = `${minutes.toString().padStart(2, '0')}:${seconds.toString().padStart(2, '0')}`; } // Function to start and manage timer function startTimer(phase) { let timeLeft = phase === 'prep' ? prepTime : recTime; updateTimer(elements.timerDisplays[phase], timeLeft); elements.timers[phase].classList.remove('hidden'); return setInterval(() => { timeLeft--; updateTimer(elements.timerDisplays[phase], timeLeft); if (timeLeft <= 0) { clearInterval(currentTimer); elements.timers[phase].classList.add('hidden'); if (phase === 'prep') startRecording(); else stopRecording(); } }, 1000); } // Function to start preparation timer function startPreparationTimer() { showSection('interview'); elements.status.textContent = "Prepare your answer..."; currentTimer = startTimer('prep'); } // Utitlity function to start recording function startRecording() { elements.videoContainer.classList.remove('hidden'); recordedChunks = []; mediaRecorder.start(1000); // Record in 1-second chunks elements.status.textContent = "Recording in progress..."; currentTimer = startTimer('rec'); console.log('Recording started'); } // Utitlity function to stop recording function stopRecording() { mediaRecorder.stop(); elements.status.textContent = "Processing your response..."; showSection('result'); console.log('Recording stopped'); } // Utitlity function to upload recorded video function uploadVideo(blob) { console.log('Uploading video. Blob size:', blob.size, 'bytes'); const formData = new FormData(); formData.append('video', blob, 'interview.mp4'); fetch('/upload', { method: 'POST', body: formData }) .then(response => { if (!response.ok) { return response.json().then(err => { throw new Error(err.error || `HTTP error! status: ${response.status}`); }); } return response.json(); }) .then(data => { console.log('Received data:', data); displayResults(data); }) .catch(error => { console.error('Error:', error); showError(error.message); }); } // Utitlity function to display analysis results function displayResults(data) { let resultHTML = '<h3>Analysis Results:</h3>'; if (data.error) { resultHTML += `<p class="error">Error: ${data.error}</p>`; } else { resultHTML += '<div class="score-grid">'; const metrics = [ { key: 'confidence', label: 'Confidence' }, { key: 'clarity', label: 'Clarity' }, { key: 'speech_rate', label: 'Speech Rate' }, { key: 'eye_contact', label: 'Eye Contact' }, { key: 'body_language', label: 'Body Language' }, { key: 'voice_tone', label: 'Voice Tone' } ]; metrics.forEach(metric => { resultHTML += ` <div class="score"> <span class="score-label">${metric.label}</span> <span class="score-value">${data[metric.key]}/10</span> </div> `; }); resultHTML += '</div>'; if (data.imp_points && data.imp_points.length > 0) { resultHTML += '<h4>Key Points:</h4><ul>'; data.imp_points.forEach(point => { resultHTML += `<li>${point}</li>`; }); resultHTML += '</ul>'; } else { resultHTML += '<p>No key points found in the analysis.</p>'; } } elements.result.innerHTML = resultHTML; } // Utitlity function to display error messages function showError(message) { elements.result.innerHTML = ` <p class="error">Error: ${message}</p> <p>Please try again. If the problem persists, ensure you're recording for the full time and that your video and audio are working correctly.</p> `; } elements.startButton.addEventListener('click', () => { setupCamera().then(() => { fetch('/get_question') .then(response => response.json()) .then(data => { elements.question.textContent = data.question; startPreparationTimer(); }) .catch(error => { console.error('Error fetching question:', error); showError('Failed to fetch interview question. Please try again.'); }); }); }); });
This code configures the user's camera and microphone (setupCamera()) and manages video recordings using the MediaRecorder API.
The
setupCamera()function configures the user's camera and microphone and manages video recording using the MediaRecorder API.To provide users with a structured interview experience, the application implements preparation and recording timers (
startTimer(),startPreparationTimer()).Functions like
startRecording()andstopRecording()control the flow of the interview.The
uploadVideo()function uploads the recorded video to a server for indexing and generation using Pegasus 1.1 analysis.AI feedback, including interview performance scores and key points, is rendered using
displayResults().
An event listener on the start button initiates the entire interview process when clicked. The script provides robust error handling through the showError() function, offering users clear feedback.
After the interview video recording is complete, the AI Interview Analyzer's output can be viewed.

The application is now ready for use. Feel free to experiment with different prompts.
More Ideas to Experiment with the Tutorial
Understanding the working procedure and development of an application prepares you to implement innovative ideas and create a product that caters to user needs. Here are some use case ideas similar to the tutorial blog that you can build upon:
📚️ Interview Preparation: Employers and job seekers can use the AI Interview Analyzer to practice and refine their interview skills in a realistic environment.
🤝 Hiring Process Enhancement: Recruiters and hiring managers can use the AI Interview Analyzer to streamline and optimize their hiring process, making it more effective.
🎓 Employee Skill Development: Training and development organizations can incorporate the AI Interview Analyzer into their programs to improve employees' interview skills.
😊️ Positive Candidate Experience: Job seekers receive valuable insights and feedback from the AI Interview Analyzer, resulting in a more positive candidate experience.
Conclusion
This blog post aims to provide you with a detailed explanation of the working procedure and how the application AI Interview Analyzer is developed with Twelve Labs. Thank you for following along with the tutorial. We look forward to your ideas on improving the user experience and solving various problems.
Introduction
Imagine stepping into an interview room where your every gesture, word, and expression is not just observed, but understood. Welcome to the future of job interviews, where artificial intelligence becomes your personal coach and confidant. The AI Interview Analyzer is here, and it's about to revolutionize the process for both job seekers and recruiters alike.
In today's competitive job market, acing that crucial interview can make the difference between landing your dream job and watching it slip away. But what if you had a secret weapon? A tool that could analyze your performance, highlight your strengths, and gently suggest areas for improvement?
That's exactly what the AI Interview Analyzer offers, using the Pegasus-1 model from Twelve Labs to provide insights once exclusive to seasoned HR professionals.
You can explore the demo of the application here: Interview Analyzer Application. You can also play with it via this Replit template.
Prerequisites
Generate an API key by signing up at the Twelve Labs Playground.
Find the repository for the notebooks and this application on GitHub.
The Flask application in this tutorial makes use of Python, HTML, CSS and Javascript.
Working of the Application
This section outlines the application flow for developing and using the Twelve Labs Powered Interview Preparation Application.
The interview process begins with random aptitude questions appearing for a limited time to prepare the user. Once the user finishes answering, the application automatically starts recording the interview for a set duration. After recording, the video is immediately processed and sent for indexing using the Marengo 2.6 (Embedding Engine).
According to the instruction prompting performed on Twelve Labs' Generative Engine, known as Pegasus 1.1, it analyzes and scores various parameters used to evaluate video interviews. These parameters include Confidence, Clarity, Eye Contact, Body Language, Speech Rate, and Voice Tone. Additionally, it notes down all the key points discussed during the interview. Companies or organizations can utilize this application to conduct automated interviews for numerous candidates, saving time. Alternatively, it can provide feedback on interview practice, helping users improve their performance.
Preparation Steps
Sign up and create an Index on the Twelve Labs Playground.
Choose the appropriate options for classification: (1) Marengo 2.6 (Embedding Engine) for video search and classification; or (2) Pegasus 1.1 for video-to-text generation. These engines provide a robust foundation for video understanding.
Obtain your API Key from the Twelve Labs Playground.
Retrieve your INDEX_ID by opening the Index created in step 1. The ID is in the URL: https://playground.twelvelabs.io/indexes/{index_id}.
Set up the
.envfile with your API Key and INDEX_ID, along with the main file.
Twelvelabs_API=your_api_key_here
API_URL=your_api_url_here
INDEX_ID=your_index_id_here
With these steps completed, you're now ready to dive in and develop the application!
Walkthrough for Building the AI Interview Analyzer
In this tutorial, we will build a Flask application with a minimal frontend. Below is the directory structure we will follow:
.
├── app.py
├── requirements.txt
├── static
│   ├── css
│   │   └── style.css
│   └── js
│       └── main.js
├── templates
│   └── index.html
└── uploads
1 - Preparing the Flask Application
1.1 - Setup of the Application - Verification, Processing and Serving Interview Question
The main Python code of the Flask container is found in the app.py file. To understand app.py, let's break it down into two parts: the setup and the upload route. The setup initializes the application, while the upload route interacts with the embedding and generative engine. Here's an overview of the setup part of app.py:
# Importing the necessary module
import os
import json
import random
from flask import Flask, render_template, request, jsonify
from twelvelabs import TwelveLabs
from twelvelabs.models.task import Task
import requests
from dotenv import load_dotenv

# Load environment variables
load_dotenv()

# Initialize the Flask app
app = Flask(__name__)

# Get the API credentials from env variables
API_KEY = os.getenv('API_KEY')
API_URL = os.getenv('API_URL')
index_id = os.getenv('index_id')

# Initialize TwelveLabs client
client = TwelveLabs(api_key=API_KEY)

# List of the Aptitude Interview Questions
INTERVIEW_QUESTIONS = [
    "Tell me about yourself.",
    "What are your greatest strengths?",
    "What do you consider to be your weaknesses?",
    "Where do you see yourself in five years?",
    "Why should we hire you?",
    "What motivates you?",
    "What are your career goals?",
    "How do you work in a team?",
    "What's your leadership style?"
]


# Utility function to check API connection
def check_api_connection():
    try:
        response = requests.get(API_URL, headers={"x-api-key": API_KEY})
        return response.status_code == 200
    except requests.RequestException as e:
        print(f"API connection check failed. Error: {str(e)}")
        return False

# Utitliy function to process API response
def process_api_response(data):
    # Initialize default processed data structure
    processed_data = {
        "confidence": "N/A",
        "clarity": "N/A",
        "speech_rate": "N/A",
        "eye_contact": "N/A",
        "body_language": "N/A",
        "voice_tone": "N/A",
        "imp_points": []
    }

    # Handling the string input (convert to dict, if possible)
    if isinstance(data, str):
        try:
            cleaned_data = data.replace("```json", "").replace("```", "").strip()
            data = json.loads(cleaned_data)
        except json.JSONDecodeError as e:
            print(f"Error decoding JSON - {e}")
            return processed_data

    # Extract data from dict
    if isinstance(data, dict):
        for key in processed_data.keys():
            processed_data[key] = data.get(key, "N/A")
    return processed_data

# Main Page Route
@app.route('/')
def index():
    return render_template('index.html')

# API route to get a random interview question from list
@app.route('/get_question')
def get_question():
    question = random.choice(INTERVIEW_QUESTIONS)
    return jsonify({"question": question})
In the setup, we initialize the client for the Twelve Labs SDK and the Response Processing utility. We also begin generating aptitude-based interview questions. The next crucial step is to examine the second half of the application, which focuses on its core functionality.
1.2 - Upload Route and Interaction with the Embedding and Generative Engine
# Route for upload
@app.route('/upload', methods=['POST'])
def upload():
    # Checking of the API connection before proceeding
    if not check_api_connection():
        return jsonify({"error": "Failed to connect to the Twelve Labs API."}), 500

    # Validate video file in request
    if 'video' not in request.files:
        return jsonify({"error": "No video file provided"}), 400
    video = request.files['video']
    if video.filename == '':
        return jsonify({"error": "No video file selected"}), 400

    # Save uploaded video file
    video_path = os.path.join('uploads', 'interview.mp4')
    video.save(video_path)

    # Verifying whether the video file was saved successfully
    if not os.path.exists(video_path):
        return jsonify({"error": "Failed to save video file"}), 500

    file_size = os.path.getsize(video_path)
    print(f"Uploaded video file size: {file_size} bytes")

    if file_size == 0:
        return jsonify({"error": "Uploaded video file is empty"}), 500

    try:

       # Create and wait for indexing task
        task = client.task.create(index_id=index_id, file=video_path)
        task.wait_for_done(sleep_interval=5)
        if task.status != "ready":
            return jsonify({"error": f"Indexing failed with status {task.status}"}), 500


        # Generate text analysis from the video
        result = client.generate.text(
            video_id=task.video_id,
            prompt="""You're an Interviewer, Analyze the video clip of the interview answer for the question - {question}.
            If the face is not present in the video then do provide the lower points in all categories, Do provide less than 5 for all the other categories if the face is not visible in the video.

            Do provide the response in the json format with the number assigned as the value.
            After analyzing from 1-10. The keys of the json as confidence, clarity, speech_rate, eye_contact, body_language, voice_tone, relevant_to_question, imp_points.
            The imp_points will contain the exact sentence in a summarized points by the speaker, also do remove the filler words and provide it in a list format which is important from video."""
        )

        # Process and return the API response
        print("Raw API Response:", json.dumps(result.data, indent=2))
        processed_data = process_api_response(result.data)
        print("Processed data:", json.dumps(processed_data, indent=2))
        return jsonify(processed_data), 200
    except Exception as e:

        # To Handle any errors during processing
        print(f"Error processing video: {str(e)}")
        return jsonify({"error": f"Error processing video: {str(e)}"}), 500


# Run the Flask app
if __name__ == '__main__':
    os.makedirs('uploads', exist_ok=True) # To ensure whether the uploads directory exists
    app.run(debug=True)
The Upload route handles the upload and processing of interview videos, leveraging the Twelve Labs API for video analysis. Once the video is saved, a task is created to index the video using Marengo 2.6 (Embedding Engine). The indexed video is then accessed by the /generate endpoint, powered by Pegasus 1.1 (Generative Engine).
The system analyzes the video and provides a response based on a brief prompt description. A prompt structure consists of three components: characteristics, objectives, and response format.
2 - Minimal Frontend Code for the Instruction Flow
The HTML structure of the AI Interview Analyzer web application is a single-page application with three main sections: start, interview, and result.
<!DOCTYPE html>
<html lang="en">
<head>
    <meta charset="UTF-8">
    <meta name="viewport" content="width=device-width, initial-scale=1.0">
    <title>AI Interview Analyzer</title>
    <link href="https://fonts.googleapis.com/css2?family=Inter:wght@300;400;600&display=swap" rel="stylesheet">
    <link rel="stylesheet" href="{{ url_for('static', filename='css/style.css') }}">
</head>
<body>
    <div class="container">
        <header>
            <h1>AI Interview Analyzer</h1>
            <p>Enhance Your Interview Skills with AI Powered Feedback</p>
        </header>
        <main>

            <section id="start-section" class="card">
                <h2>Ready to Start Your Interview?</h2>
                <p>Click the button below to begin your AI powered interview experience.</vp>
                <button id="startInterviewButton" class="btn btn-primary">Start Interview</button>
            </section>


            <section id="interview-section" class="card hidden">

                <div id="question-container">
                    <h2>Interview Question -</h2>
                    <p id="interview-question"></p>
                </div>

                <div id="timer-container">
                    <div id="preparation-timer" class="timer">
                        Preparation Time - <span id="prep-time">00:20</span>
                    </div>
                    <div id="recording-timer" class="timer hidden">
                        Recording Time - <span id="rec-time">00:30</span>
                    </div>
                </div>


                <div id="video-container" class="hidden">
                    <video id="videoElement" autoplay muted></video>
                </div>


                <div id="status-message" class="status"></div>
            </section>

            <section id="result-section" class="card hidden">

                <h2>Analysis Results</h2>
                <div id="result" class="result-container">
                    <div id="loading-message" class="loading">Analyzing your response...</div>
                    <small>It may take around 3-4 mins</small>
                </div>
            </section>
        </main>
    </div>
    <script src="{{ url_for('static', filename='js/main.js') }}"></script>
</body>
</html>
The minimal frontend sections are:
Start Section: The initial view users see when loading the page, containing a welcome message and a button to start the interview process.
Interview Section: Revealed when the interview starts, displaying the current question, timers for preparation and recording, and a video feed of the user.
Result Section: Displays the AI's analysis results after the interview is complete.
The structure outlines a step-by-step interview process, from beginning the interview to receiving AI feedback. Smooth transitions between interview stages are enabled by hidden classes, managed by the JavaScript code in main.js, which is explained below.
For the styling of the application, you can get the style.css from here.
3 - Recording Functionality and Error Handling in Javascript
The JavaScript snippet below is main.js, containing media recording settings for the browser environment, processing of analysis text results, and error handling.
document.addEventListener('DOMContentLoaded', () => { // Object to store all DOM elements const elements = { startButton: document.getElementById('startInterviewButton'), sections: { start: document.getElementById('start-section'), interview: document.getElementById('interview-section'), result: document.getElementById('result-section') }, video: document.getElementById('videoElement'), videoContainer: document.getElementById('video-container'), question: document.getElementById('interview-question'), timers: { prep: document.getElementById('preparation-timer'), rec: document.getElementById('recording-timer') }, timerDisplays: { prep: document.getElementById('prep-time'), rec: document.getElementById('rec-time') }, status: document.getElementById('status-message'), result: document.getElementById('result') }; // Variables for media recording let mediaRecorder; let recordedChunks = []; const prepTime = 20; // Interview Preparation time in seconds const recTime = 30; // Video Interview Recording time in seconds let currentTimer; // Function to set up camera and media recorder async function setupCamera() { try { // Request access to user's camera and microphone const stream = await navigator.mediaDevices.getUserMedia({ video: { width: 640, height: 480 }, audio: true }); elements.video.srcObject = stream; // Set up media recorder const options = { mimeType: 'video/mp4' }; mediaRecorder = new MediaRecorder(stream, options); // Event handler for when data is available mediaRecorder.ondataavailable = (event) => { if (event.data.size > 0) { recordedChunks.push(event.data); } }; // Event handler for when recording stops mediaRecorder.onstop = () => { const blob = new Blob(recordedChunks, { type: 'video/mp4' }); console.log('Recording stopped. Blob size:', blob.size, 'bytes'); if (blob.size > 0) { uploadVideo(blob); } else { showError("Recording failed: No data captured."); } }; } catch (error) { console.error('Error accessing camera:', error); showError('Unable to access camera. Please ensure you have given permission and try again.'); } } // Utility function to show a specific section and hide others function showSection(section) { Object.values(elements.sections).forEach(s => s.classList.add('hidden')); elements.sections[section].classList.remove('hidden'); } // Utility function to update timer display function updateTimer(timerElement, time) { const minutes = Math.floor(time / 60); const seconds = time % 60; timerElement.textContent = `${minutes.toString().padStart(2, '0')}:${seconds.toString().padStart(2, '0')}`; } // Function to start and manage timer function startTimer(phase) { let timeLeft = phase === 'prep' ? prepTime : recTime; updateTimer(elements.timerDisplays[phase], timeLeft); elements.timers[phase].classList.remove('hidden'); return setInterval(() => { timeLeft--; updateTimer(elements.timerDisplays[phase], timeLeft); if (timeLeft <= 0) { clearInterval(currentTimer); elements.timers[phase].classList.add('hidden'); if (phase === 'prep') startRecording(); else stopRecording(); } }, 1000); } // Function to start preparation timer function startPreparationTimer() { showSection('interview'); elements.status.textContent = "Prepare your answer..."; currentTimer = startTimer('prep'); } // Utitlity function to start recording function startRecording() { elements.videoContainer.classList.remove('hidden'); recordedChunks = []; mediaRecorder.start(1000); // Record in 1-second chunks elements.status.textContent = "Recording in progress..."; currentTimer = startTimer('rec'); console.log('Recording started'); } // Utitlity function to stop recording function stopRecording() { mediaRecorder.stop(); elements.status.textContent = "Processing your response..."; showSection('result'); console.log('Recording stopped'); } // Utitlity function to upload recorded video function uploadVideo(blob) { console.log('Uploading video. Blob size:', blob.size, 'bytes'); const formData = new FormData(); formData.append('video', blob, 'interview.mp4'); fetch('/upload', { method: 'POST', body: formData }) .then(response => { if (!response.ok) { return response.json().then(err => { throw new Error(err.error || `HTTP error! status: ${response.status}`); }); } return response.json(); }) .then(data => { console.log('Received data:', data); displayResults(data); }) .catch(error => { console.error('Error:', error); showError(error.message); }); } // Utitlity function to display analysis results function displayResults(data) { let resultHTML = '<h3>Analysis Results:</h3>'; if (data.error) { resultHTML += `<p class="error">Error: ${data.error}</p>`; } else { resultHTML += '<div class="score-grid">'; const metrics = [ { key: 'confidence', label: 'Confidence' }, { key: 'clarity', label: 'Clarity' }, { key: 'speech_rate', label: 'Speech Rate' }, { key: 'eye_contact', label: 'Eye Contact' }, { key: 'body_language', label: 'Body Language' }, { key: 'voice_tone', label: 'Voice Tone' } ]; metrics.forEach(metric => { resultHTML += ` <div class="score"> <span class="score-label">${metric.label}</span> <span class="score-value">${data[metric.key]}/10</span> </div> `; }); resultHTML += '</div>'; if (data.imp_points && data.imp_points.length > 0) { resultHTML += '<h4>Key Points:</h4><ul>'; data.imp_points.forEach(point => { resultHTML += `<li>${point}</li>`; }); resultHTML += '</ul>'; } else { resultHTML += '<p>No key points found in the analysis.</p>'; } } elements.result.innerHTML = resultHTML; } // Utitlity function to display error messages function showError(message) { elements.result.innerHTML = ` <p class="error">Error: ${message}</p> <p>Please try again. If the problem persists, ensure you're recording for the full time and that your video and audio are working correctly.</p> `; } elements.startButton.addEventListener('click', () => { setupCamera().then(() => { fetch('/get_question') .then(response => response.json()) .then(data => { elements.question.textContent = data.question; startPreparationTimer(); }) .catch(error => { console.error('Error fetching question:', error); showError('Failed to fetch interview question. Please try again.'); }); }); }); });
This code configures the user's camera and microphone (setupCamera()) and manages video recordings using the MediaRecorder API.
The
setupCamera()function configures the user's camera and microphone and manages video recording using the MediaRecorder API.To provide users with a structured interview experience, the application implements preparation and recording timers (
startTimer(),startPreparationTimer()).Functions like
startRecording()andstopRecording()control the flow of the interview.The
uploadVideo()function uploads the recorded video to a server for indexing and generation using Pegasus 1.1 analysis.AI feedback, including interview performance scores and key points, is rendered using
displayResults().
An event listener on the start button initiates the entire interview process when clicked. The script provides robust error handling through the showError() function, offering users clear feedback.
After the interview video recording is complete, the AI Interview Analyzer's output can be viewed.
The application is now ready for use. Feel free to experiment with different prompts.
More Ideas to Experiment with the Tutorial
Understanding the working procedure and development of an application prepares you to implement innovative ideas and create a product that caters to user needs. Here are some use case ideas similar to the tutorial blog that you can build upon:
📚️ Interview Preparation: Employers and job seekers can use the AI Interview Analyzer to practice and refine their interview skills in a realistic environment.
🤝 Hiring Process Enhancement: Recruiters and hiring managers can use the AI Interview Analyzer to streamline and optimize their hiring process, making it more effective.
🎓 Employee Skill Development: Training and development organizations can incorporate the AI Interview Analyzer into their programs to improve employees' interview skills.
😊️ Positive Candidate Experience: Job seekers receive valuable insights and feedback from the AI Interview Analyzer, resulting in a more positive candidate experience.
Conclusion
This blog post aims to provide you with a detailed explanation of the working procedure and how the application AI Interview Analyzer is developed with Twelve Labs. Thank you for following along with the tutorial. We look forward to your ideas on improving the user experience and solving various problems.
Related articles


© 2021
-
2026
TwelveLabs, Inc. All Rights Reserved
© 2021
-
2026
TwelveLabs, Inc. All Rights Reserved
© 2021
-
2026
TwelveLabs, Inc. All Rights Reserved